How to Troubleshoot Unknown USB Device (Device Descriptor Request Failed) Error?
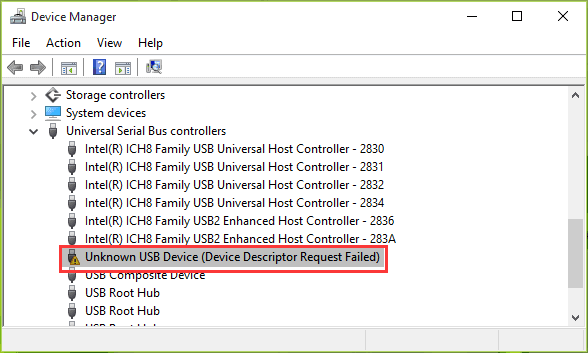
At times, if you attach an external USB device to the Windows 10 then an error message saying “USB not recognized. Device Descriptor Request Failed” pops-up on your screen. A device which is malfunctioned will be labelled as “Unknown USB Device (Device Descriptor Request Failed)” with a yellow triangle which indicates that your device is not working properly or USB is not recognized as it is already labelled as an Unknown USB device.

However, the USB descriptor is responsible for storing all the information which is related to various USB devices and also identifying these USB devices in the future when you connected it to the system. Though, if the USB is not recognized then the USB device descriptor is not working properly on your system. As a result, you will face the Device Descriptor Request Failed error.
Some causes of this error are as follows:
- Corrupted, outdated, or incompatible USB device drivers
- Malware or virus might corrupt your system.
- The USB port is not working properly or malfunctioned
- USB device might be damaged
Below we discuss a few simple steps which guide you in fixing the Unknown USB Device (Device Descriptor Request Failed) error. But for this, you have to follow the instruction.
Steps to Fix Unknown USB Device (Device Descriptor Request Failed) Error
We suggest you that create a restore point in case something goes wrong. Here how to do it:
Change the USB Selective Suspend Settings
- Firstly, right-click on the battery icon on the Taskbar.
- Then, select the Power options.
- Click on the Change plan settings option.
- After that, click on the Change advanced power settings option.
- Now, find out the USB settings option and then click on the Plus (+) icon to expand it.
- Again, expand the USB selective suspend settings and confirm to choose Disabled for both “On Battery” and “Plugged in”.
- Lastly, click on the Apply tab.
- Then, click on the OK tab.
Finally, restart your computer system to save
Jack Mertin is an inventive person who has been doing intensive research in particular topics and writing blogs and articles on Quicken Supportand many other related topics. He is a very knowledgeable person with lots of experience


Comments
Post a Comment